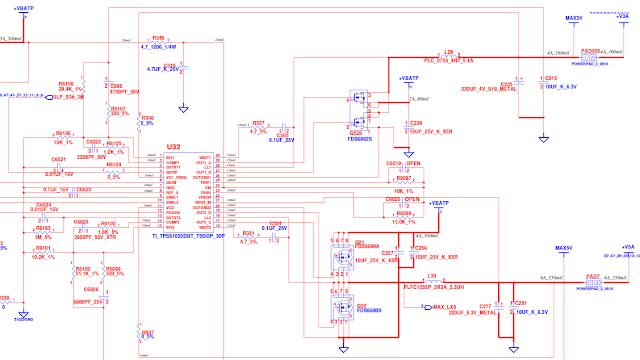
How to Check 3V/5V Circuit on Laptop Motherboard With multimeter
Understanding the 3V-5V System on Laptop Motherboard
The 3V-5V system on the laptop motherboard refers to the voltage levels that power the circuitry on the motherboard. The laptop's battery provides power to the system, which is then regulated by the voltage regulators to ensure that the power levels are consistent and stable. The 3V-5V system powers critical components such as the CPU, memory, and other integrated circuits.
Why is it Crucial to Check the 3V-5V System?
It is crucial to check the 3V-5V system on the laptop motherboard because if the voltage levels are unstable or incorrect, it can cause serious damage to the components. If the voltage levels are too low, the circuits will not function correctly, and the laptop may not boot. On the other hand, if the voltage levels are too high, it can cause the components to overheat, leading to permanent damage.
How to Check the 3V-5V System on Laptop Motherboard
Checking the 3V-5V system on the laptop motherboard is a straightforward process. You will need a multimeter and a few basic tools. Here are the steps to follow:
Step 1: Preparation
Before you start, make sure you have turned off the laptop and unplugged it from the power source. Next, remove the battery from the laptop and set it aside.
Step 2: Access the Motherboard
The next step is to access the laptop's motherboard. Depending on the model, this may involve removing the back cover or other components. Refer to the laptop's user manual or online tutorials for instructions on how to access the motherboard.
Step 3: Locate the Voltage Regulators
Once you have accessed the motherboard, you will need to locate the voltage regulators. These are small, square-shaped components usually located near the CPU or memory slots. Refer to the motherboard diagram or online resources to identify the voltage regulators' location.
Step 4: Test the Voltage
Using a multimeter, set it to measure voltage, and connect the probes to the voltage regulator's pins. The multimeter should display the voltage reading. Check the voltage levels against the specifications in the laptop's user manual or online resources. The 3V-5V system should measure between 2.5V to 5V, depending on the component.
Step 5: Repeat the Process
Repeat the process for all the voltage regulators on the motherboard. If any of the voltage readings are outside the specified range, it may indicate a problem with the voltage regulator or other components.
Common Issues with 3V-5V System on Laptop Motherboard
There are several common issues that may arise with the 3V-5V system on the laptop motherboard. These include:
Overheating
If the voltage levels are too high, it can cause the components to overheat, leading to permanent damage.
Failure to Boot
If the voltage levels are too low, the circuits will not function correctly, and the laptop may not boot.
Damage to Components
Incorrect or unstable voltage levels can cause serious damage to the components, leading to costly repairs or replacements.
Conclusion
Checking the 3V-5V system on the laptop motherboard is a critical step in troubleshooting issues that may arise with the laptop's components. It is a simple process that can be done using a multimeter and some basic tools. By following the steps outlined in this article, you can ensure that your laptop's voltage levels are stable and within the specified range, thereby preventing damage to the components.
If you encounter any issues with the voltage levels or are unsure about any aspect of the process, it is recommended that you seek professional assistance from a qualified technician.
FAQs
What is the 3V-5V system on the laptop motherboard?
The 3V-5V system on the laptop motherboard refers to the voltage levels that power the circuitry on the motherboard. The laptop's battery provides power to the system, which is then regulated by the voltage regulators to ensure that the power levels are consistent and stable.
Why is it crucial to check the 3V-5V system on the laptop motherboard?
It is crucial to check the 3V-5V system on the laptop motherboard because incorrect or unstable voltage levels can cause serious damage to the components, leading to costly repairs or replacements.
What tools are needed to check the 3V-5V system on the laptop motherboard?
To check the 3V-5V system on the laptop motherboard, you will need a multimeter and some basic tools to access the motherboard.
What are the common issues with the 3V-5V system on the laptop motherboard?
Common issues with the 3V-5V system on the laptop motherboard include overheating, failure to boot, and damage to components.
Can I check the 3V-5V system on the laptop motherboard myself?
Yes, you can check the 3V-5V system on the laptop motherboard yourself using a multimeter and some basic tools. However, if you are unsure about any aspect of the process, it is recommended that you seek professional assistance from a qualified technician.


0 Comments
Post a Comment